Table of Contents
General Information
All classes are assigned to an approved course within the system. One course can have several classes, but each class is attached to only one course.
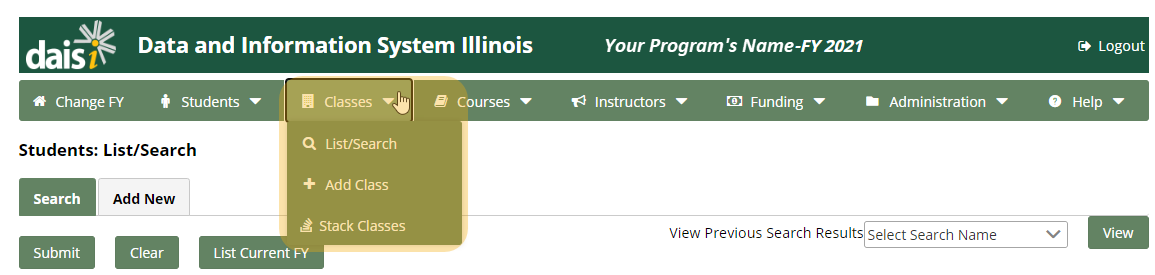
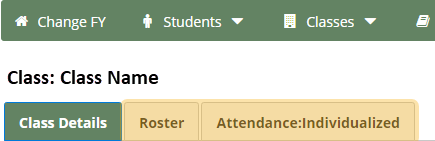
All class functionality is accessed via the Classes tab on the navigation bar.
Add Classes
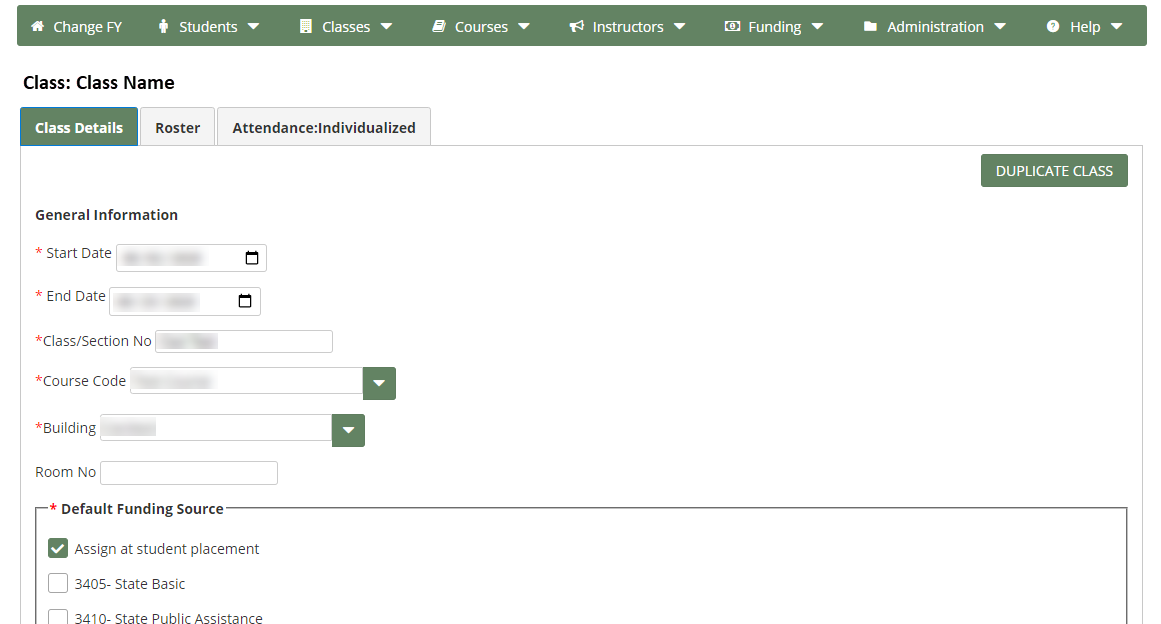
Classes are added by entering the appropriate data after selecting Add Class from the menu under the Classes tab. Required information is identified with a red asterisk (*).
The Add/Edit Details page is divided into five sections:
- General Information
- Default Funding Source
- Instructional Type
- Enrollment
- Add Instructor(s)
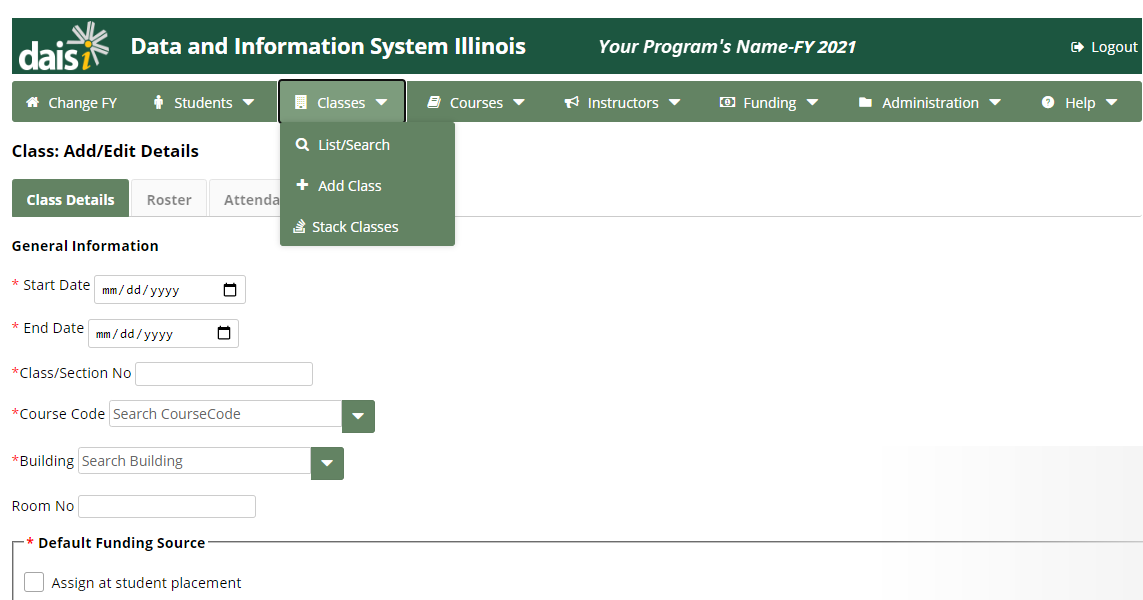
General Information
Start/End Dates
Enter the start and end dates for the class. If the start and end dates cross a fiscal year (such as a summer class), you will be prompted to select the fiscal year to which it is assigned.
Note: While you may end fiscal year classes after June 30th within DAISI, it is important to note that all grant-funded classes must end on or before June 30th. If a program elects to end a class after June 30th, it is important to ensure funding streams are used within the correct fiscal year. Additionally, testing for Educational Functioning Levels and the Illinois High School Diploma can only be claimed as a test for the current fiscal year.
Class/Section No
The class/section number may include alpha characters, numbers, and/or punctuation. The class/section number must be a name unique to your program data.
Course Code
Each class must be assigned to an existing course. Begin typing the course code into the area provided or use the drop-down menu to select it.
Once a class has been assigned to a course code, the Instruction Type section will list the instructional category that was assigned to the course when it was set up. This is displayed for informative purposes only—it cannot be changed.
Building
Identify the type or name of the building in which the class will be held (ex. Library, community based organization, etc.). Begin typing the building name into the area provided, or use the drop-down menu to select it. If a default building was selected when setting up the building list, then it will auto-fill in the building field when adding a new class. You can override the default building by selecting an alternative.
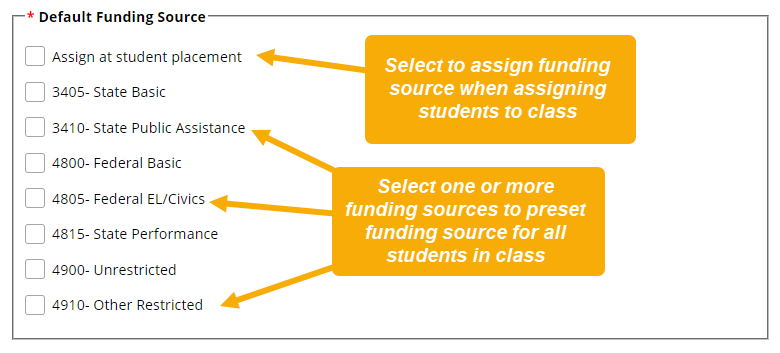
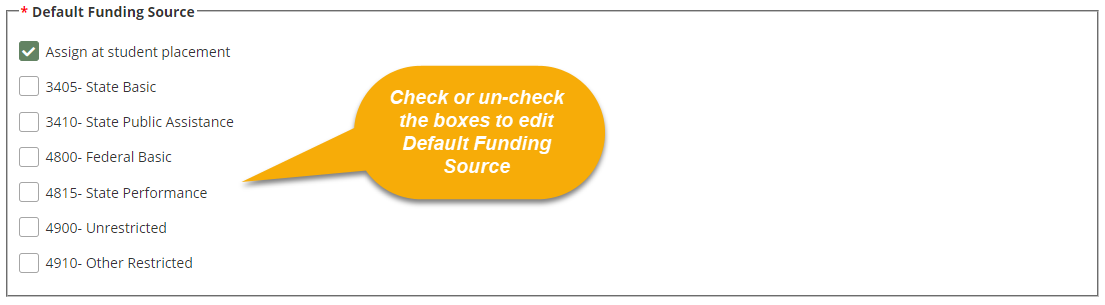
Default Funding Source
Default funding can be established to simplify the process of assigning students to funding sources during class placement. For example, selecting 4800 – Federal Basic funds here will allow only that funding source to be presented as an option when assigning students to this class. More than one funding source can be set up as a default for a class, if multiple funding sources are used to support instruction.
Selecting ‘Assign at Student Placement’ here will cause all allowable funding sources to be presented as options when assigning students to the class, and you must choose the appropriate funding source from the list for every student.
The default funding sources available for a class are determined by:
- The type of funding received by the program. For example, if your program does not receive 4805 – Federal EL/Civics funds, it will not be available for selection.
- The type of instruction provided within the course to which the class is assigned. For example, if a class is assigned to a course approved only for VOC, then 4800 – Federal Basic and 4805 – Federal EL/Civics funds will not be available for selection because federal funds cannot be used to support vocational instruction.
Note: If the only option you see here is “Assign at Student Placement,” you will need to add funding sources for your program. See the Funding section of this guide for more information on how to do this.

Note: If a student receives public assistance, that funding source will automatically be added as a funding option for that particular student when enrolling in a class. 3410 – Public Assistance funds do not need to be set up as a default funding source for the class in order to have that funding source made available for students receiving public assistance.
Note: It is important to carefully follow your program’s Cost Allocation Plan when establishing default funding and when assigning students to funding sources during class placement. Funding assignments made within DAISI should be reflective of financial and other claims within your institution.
Note for Community College Providers: One class section may be claimed in either institutional/unrestricted or restricted funds but not both. The 51% or greater rule will determine where it is claimed. Please see the FAQ for Community College System and Adult Education Funding Issues on the ICCB website for further information.
Instructional Type
As stated previously, the Instructional Type section will automatically list the instructional category based on the chosen course code. This section is for informative purposes only—it cannot be changed.
Preferred Software Model
If applicable, choose from the following options to show which Software Model your class will use to provide or supplement instruction:
- None: Default option; your class will not use a Software Model
- Approved Web-based Curricula: See a list here: https://www.iccb.org/adult_ed/remote-distance-learning/
- Other: Your class will use a Software Model not listed. If this option is chosen, the Other Software Model field will appear, and you will be prompted to choose from the following options:
- Correspondence Course
- Self-Developed Web Course

Type
If your class will use a Software Model, the Type field will appear. Choose from the following options that best describes how you will use the Software Model in your class:
- Supplemental: Students will use the Software Model during class time
- Hybrid: At a Distance or Learning Lab programming offered in conjunction with face to face instruction.
- At-a-Distance: Asynchronous instruction provided entirely through an online platform; Students are still required to pre- and post-test (with the exception of post testing for ASE High).
Models
Estimate the percentage of class time during which students will use the model. If you selected “At-a-Distance” in the Type field, you must enter “100” or you will receive an error message.

Enrollment
There are three types of enrollment to select from: open entry, fixed entry, and individualized enrollment. Select the enrollment type from the drop-down list provided. Both fixed and open entry enrollments require a class schedule or meeting times.
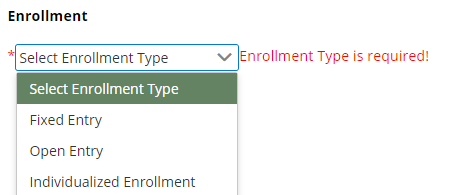
Open Entry
For open entry classes students can enroll, drop, and re-enroll any time during a semester or fiscal year. All of the attendance hours, enrollment hours, contact, and units roll up into one total for the class. Students must be dropped after five consecutive absences.
Fixed Entry
In fixed entry classes students must enroll in the class by the 3rd scheduled day of the class. A mid-term date is established for a fixed entry class during class set-up based on the start and end dates of the class. If a student drops prior to the mid-term he/she will not be considered enrolled and no enrollment hours will be calculated or reported. If a student is still enrolled at mid-term the enrollment hours for the entire term or semester will be credited when attendance for the mid-term date is entered.
As with open entry, five consecutive absences require a student be dropped from the class. If a student remains enrolled at mid-term and drops the class after the mid-term date, he/she may re-enroll later in the term. However, if a student accumulates 5 consecutive absences and drops from the class prior to the mid-term date, he/she is not permitted to re-enroll into that same class.
Individualized Enrollment
As within open entry classes, students can enroll at any time. However, there is no established meeting schedule. Each time a student completes a lesson with 70% or greater accuracy, the actual date and number of lessons/hours is entered. Attendance and enrollment hours will be identical to one another, and absences, Unscheduled, and Given Days do not apply. Students can be dropped at any point in time.
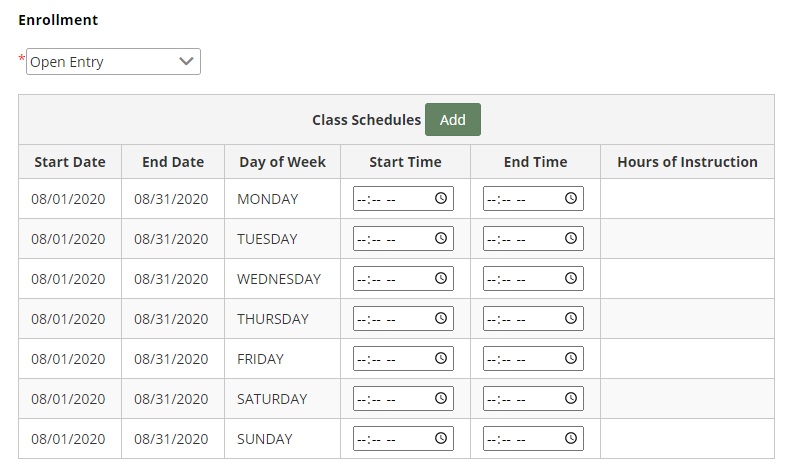
Class Schedule/Meeting Times
If you select “Fixed Entry” or “Open Entry’ as the enrollment type, you will be prompted to add the schedule for your class.
Select the row with the day of appropriate day of the week, and enter the start and end time of the class by either typing the time into the box, or clicking the clock icon to select the correct time. To add another class session in the same day of the week, select Add at the top of the table.
In the rightmost column of the table, the hours of instruction will be automatically calculated.
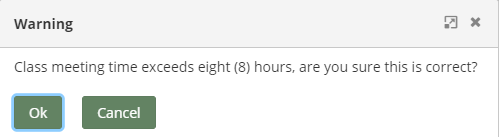
Note: If a class meeting time exceeds eight (8) hours, a pop-up window will appear confirming the class should meet for that period of time. This prompt is to prevent accidental long meeting times.
Additional Schedule Dates
Sometimes, it is necessary to add additional days to a schedule. Use the Given/Unscheduled Days and Irregular Scheduled Days to add days to the schedule.
Use the following definitions to choose the correct designation:
Scheduled Day: A date class plans to meet but is not currently included in the normal weekly class schedule.
Unscheduled Day: A date included in the normal class schedule but class will not meet (ex. campus closure, spring break, etc.)
Irregular Day: An Irregular day most often serves as a “make-up” day for classes. It is most commonly used when a class has been cancelled and another day is scheduled to make up for the class. Programs also use these days for special events related to the class. For example, if the normal class schedule is Monday and Wednesdays, the program may use an Irregular Day to bring the students in on a Thursday for a special event related to the class.
Assign Instructor
An instructor must be assigned to a class in order to have the attendance and enrollment hours from it included in reporting. However, the system will allow you to establish the class without an instructor initially, so long as you return and assign an instructor prior to running reports.
To add an instructor to a course, select Add Instructors in the Add Instructors section.

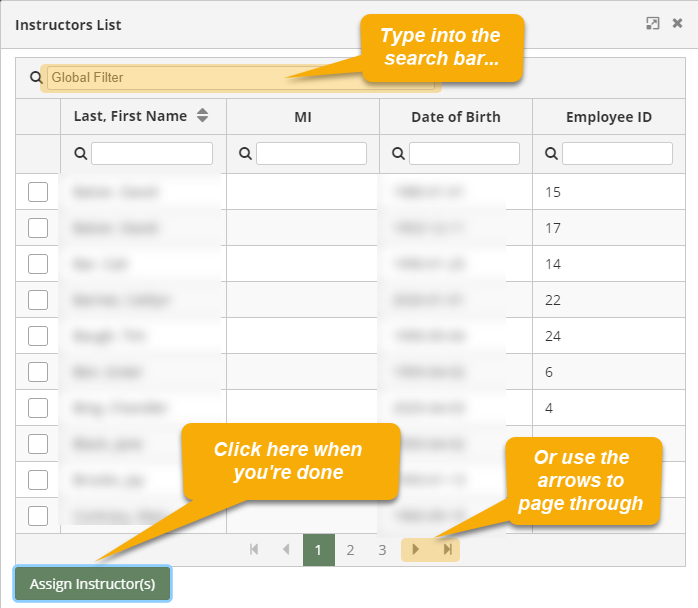
A pop-up window will appear with a list of instructors to choose from. There are two methods for assigning instructors:
- Start typing the name of the instructor into the search bar. Typing the first letter of the last name will provide a list you can select from.
- Use the arrows at the bottom of the table to page through the list of instructors.
When you are finished adding instructors to the class, click Assign Instructor(s).
When you are done editing the course, click Submit at the bottom of the page.

If any corrections are necessary, an error message will display, and red prompts will highlight the fields that need attention.
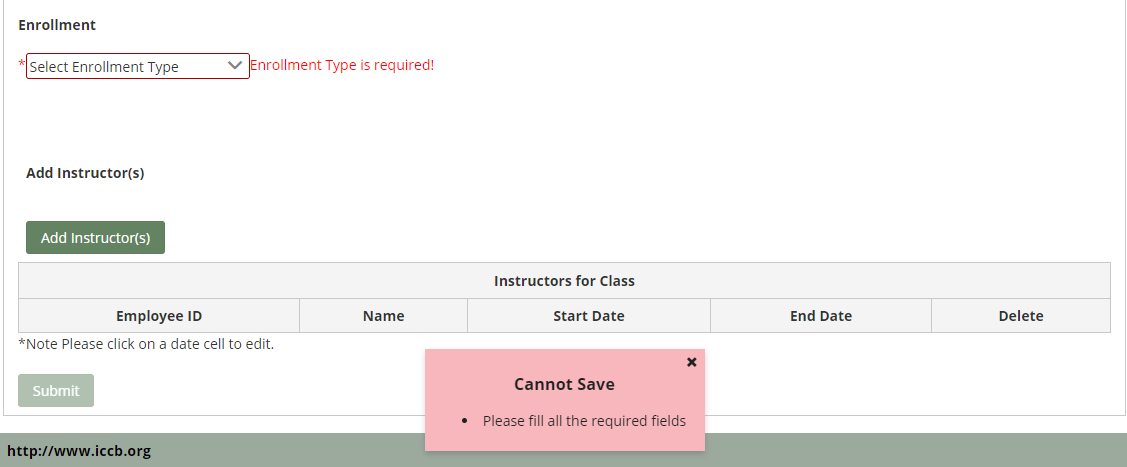
These errors will need to be corrected before a class can be saved successfully. Once you’ve corrected the errors, click Submit to save your changes.
If your save is successful, a blue prompt will appear to confirm that the class has been saved successfully.
Note: If your class is part of a bridge course, you must ensure it is listed under that bridge course. Otherwise, it will not be documented as a bridge course.
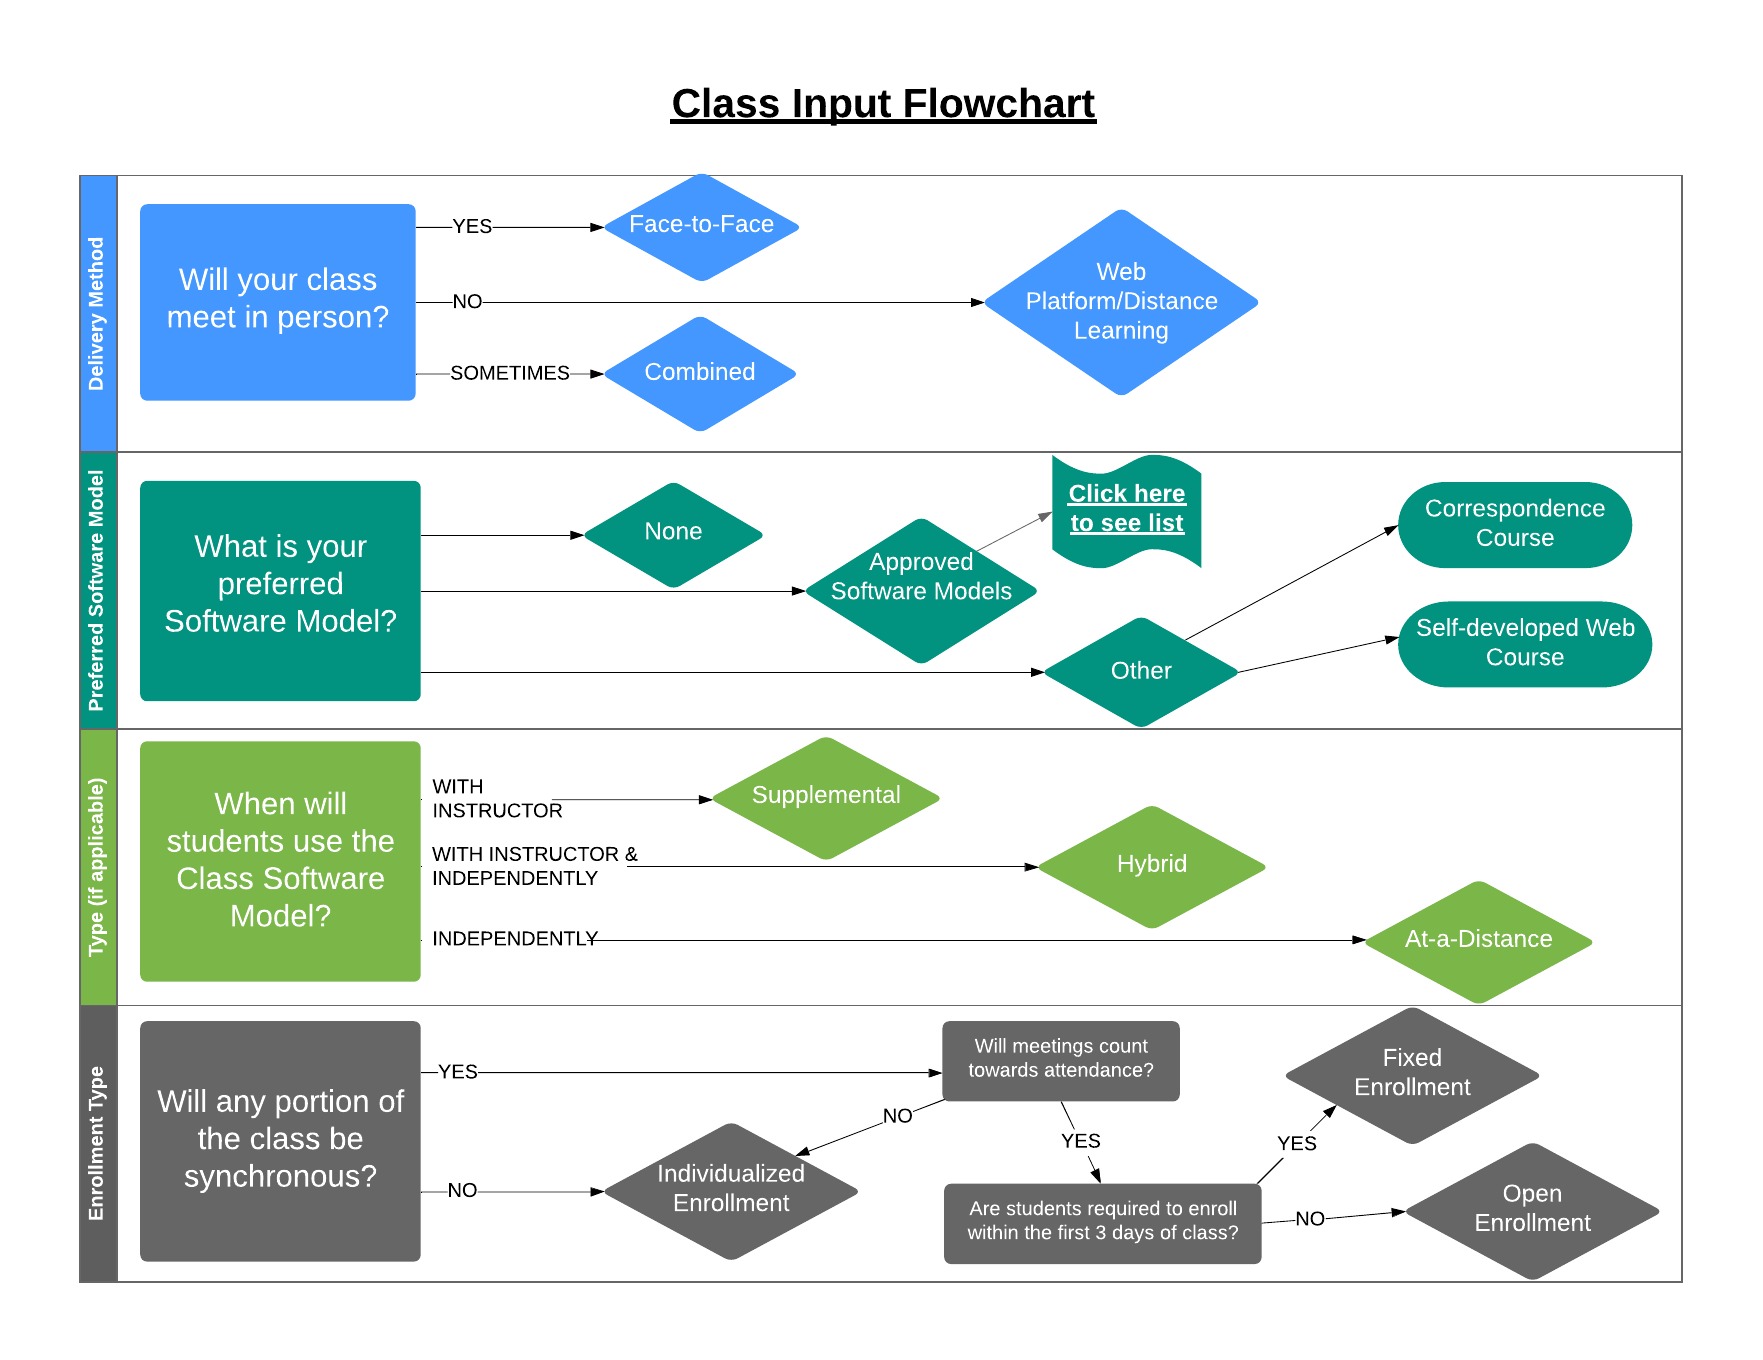
Class Input Flowchart
Having trouble figuring out which delivery method and enrollment type to select? Check out this flowchart:
Hybrid Class Set-up
In Hybrid, since this is a mix of both in class and virtual, please note that the “students will utilize the Preferred Software depending on the designated percentage set by the program. As for the fixed entry or open entry, it is also contingent upon the specific program.
- Note: if a student fails to attend the traditional class but completes the hybrid portion, the student will be dropped from the class. This student should be moved into a distance learning classroom.
Classes: List/Search
Class information can be edited and reviewed under the Classes tab by selecting the List/Search option from the menu.

Note: There is a sub-menu available on this screen under the heading with three options:
- Search: Search for a class using the listed criteria
- List Current FY: Displays classes active in the selected fiscal year without regard for additional search criteria
- Add New: Brings up the add class entry screen (the same screen displayed under the Add New function previously discussed)
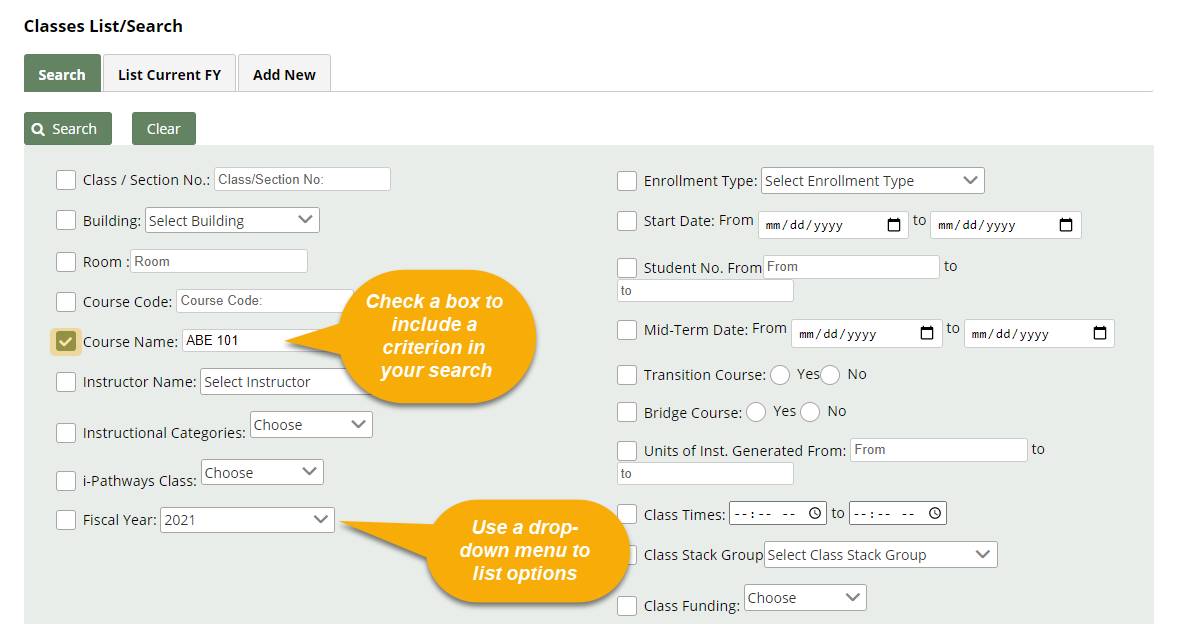
The class list/search page allows users to search for specific classes using a variety of criteria. Click on the box in front of the search criteria to include the field in the search and enter the data to use in the text field, select the check boxes, or select a value from a drop down menu or radio button option.
Remember that searching is an inclusive process. Each item checked must be found in the class data in order for it to be listed in the search results.
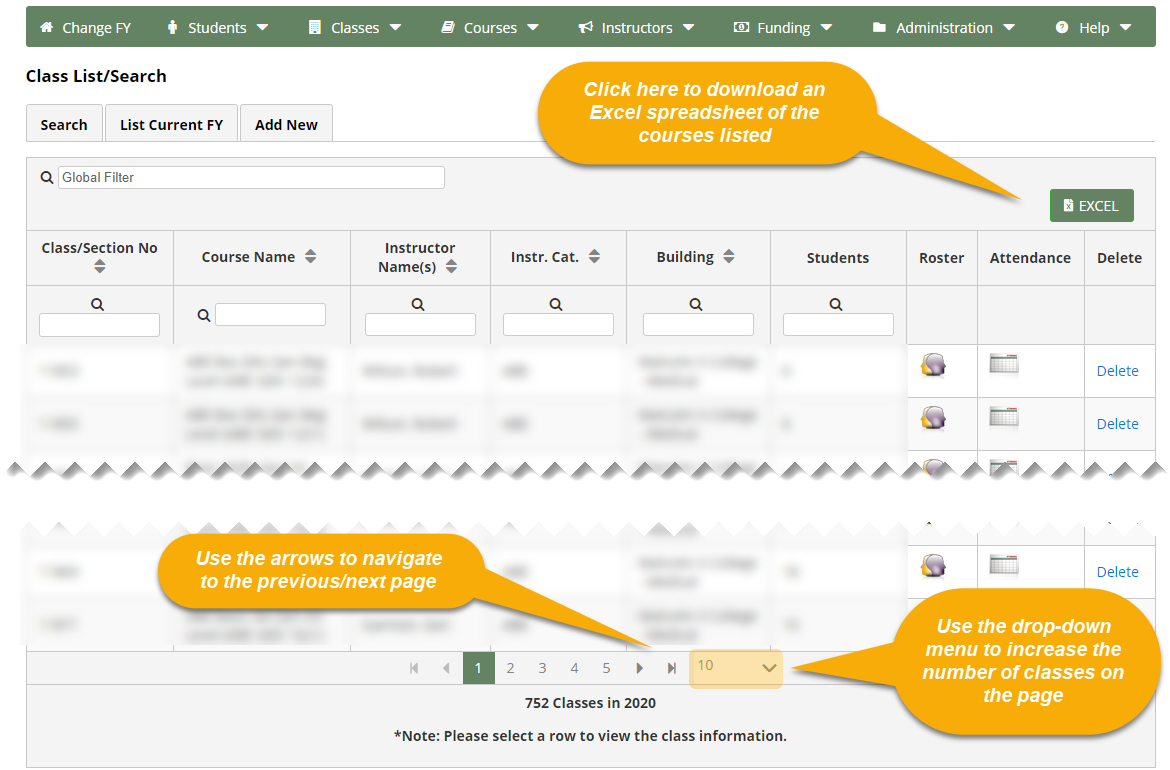
Select the search criteria and enter the search values. When finished, click the Search button to view the list of classes matching the search criteria. Each class is listed with summary information and quick links to areas of the existing class. To download an Excel spreadsheet of the courses listed, click the Excel button to the top right of the search results.
Search results will be listed with links to additional instructor detail provided. By default, only ten (10) courses are listed per search results page. Users can move to the next or previous pages by using the arrows below the list of results. If more than ten courses per page is desired, select the desired value on the Records per page drop down located in the lower right of the search results page.
Class/Section No
Click the class/section no from the search results page to view or edit individual class information.
Roster
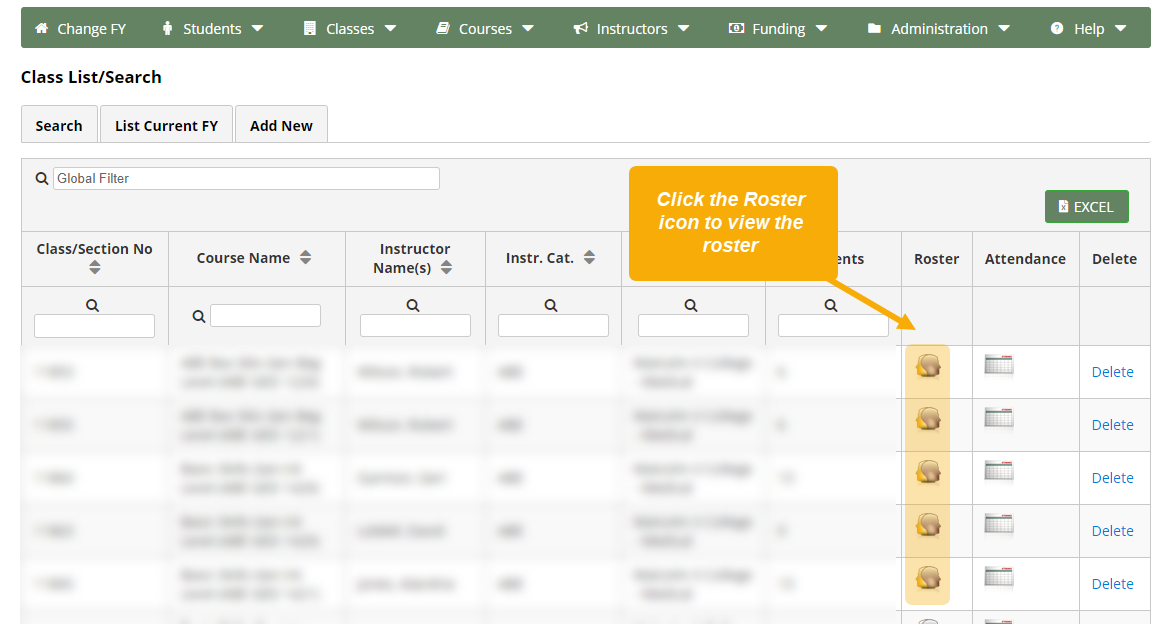
To view the class roster and/or edit the enrolled student information, click the roster icon for a selected class.
Attendance
To view or edit the attendance information for a class, click the attendance icon for a selected class.
Delete
A class can be deleted from the DAISI system by clicking the Delete link for a specific class. Note: The delete function within DAISI is permanent and non-reversible. Also note, a class can only be deleted if students have not yet been enrolled in the class.
Edit Classes
Clicking on a link to a class from the List/Search page will take you to the Add/Edit Details screen. Classes can be edited after originally entered, with several exceptions.
In addition to the class details being available, links are provided in the sub-menu to other class administration features such as roster and attendance. These sections will be covered in Classes: Roster and Classes: Attendance sections of this guide.
Edit Class Funding
Add a Funding Source
After default funding has been established, additional funding sources may still be added, if they are available for use by the class (given limitations described earlier in this section). However, default funding sources cannot be removed if students have been enrolled and funding has been assigned to these students.
If additional funding sources are desired, check the default funding source on the Edit Class screen and submit changes. The newly selected funding source will appear in the available fund source options for the student enrollment. To update an enrolled student fund source, go to the individual student enrollment record and update the funding source for the selected student.
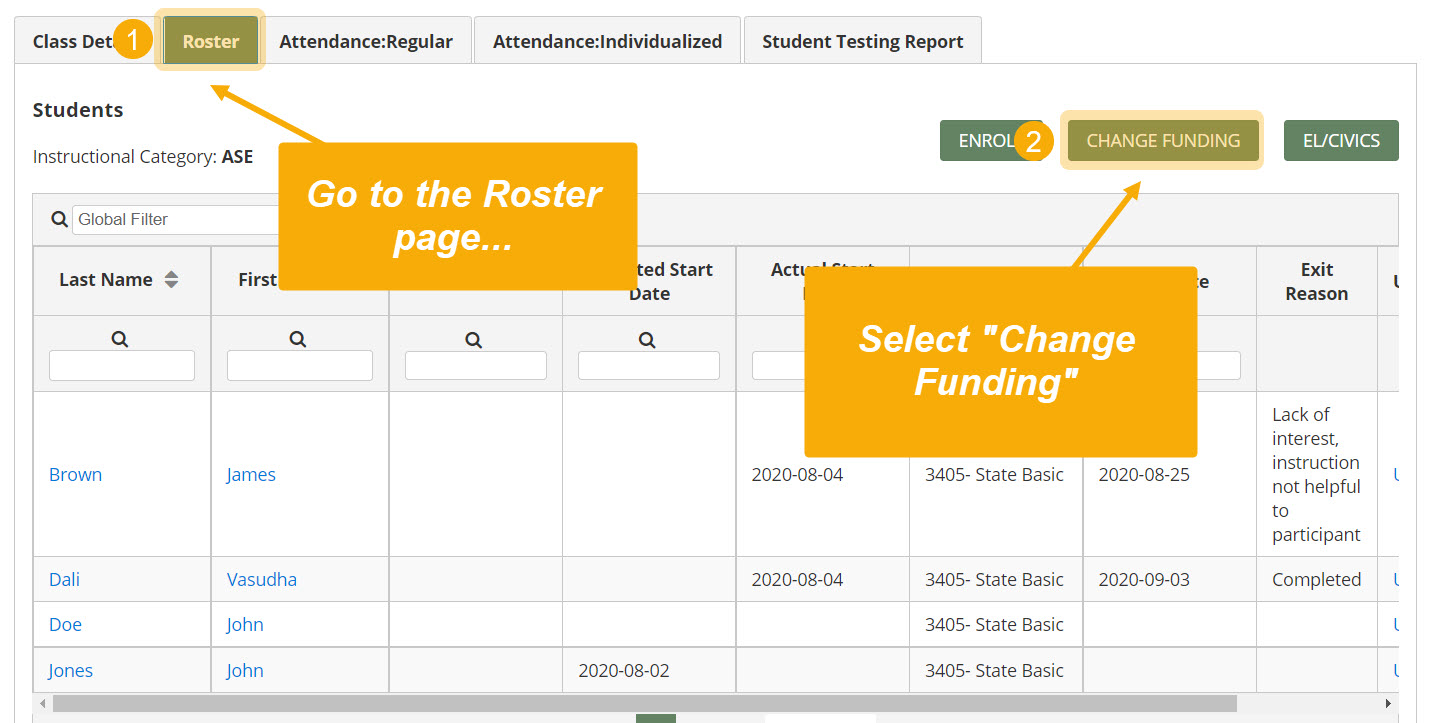
Change Class Funding Source
To reassign students in a class to a different funding source after they have already been assigned to a funding source, follow these instructions:
Step 1: Add the new funding source you’d like to assign the students to. DO NOT remove the first funding source yet. Click Submit.
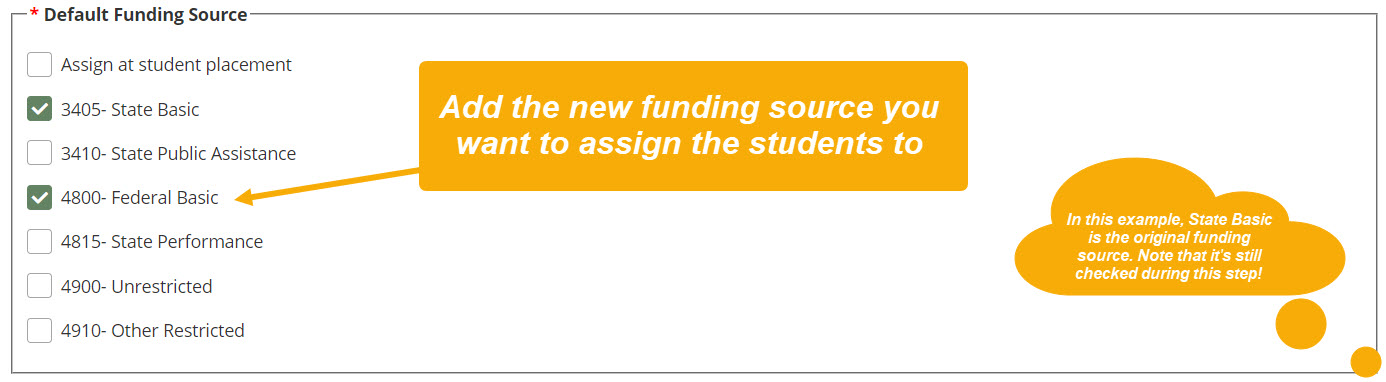
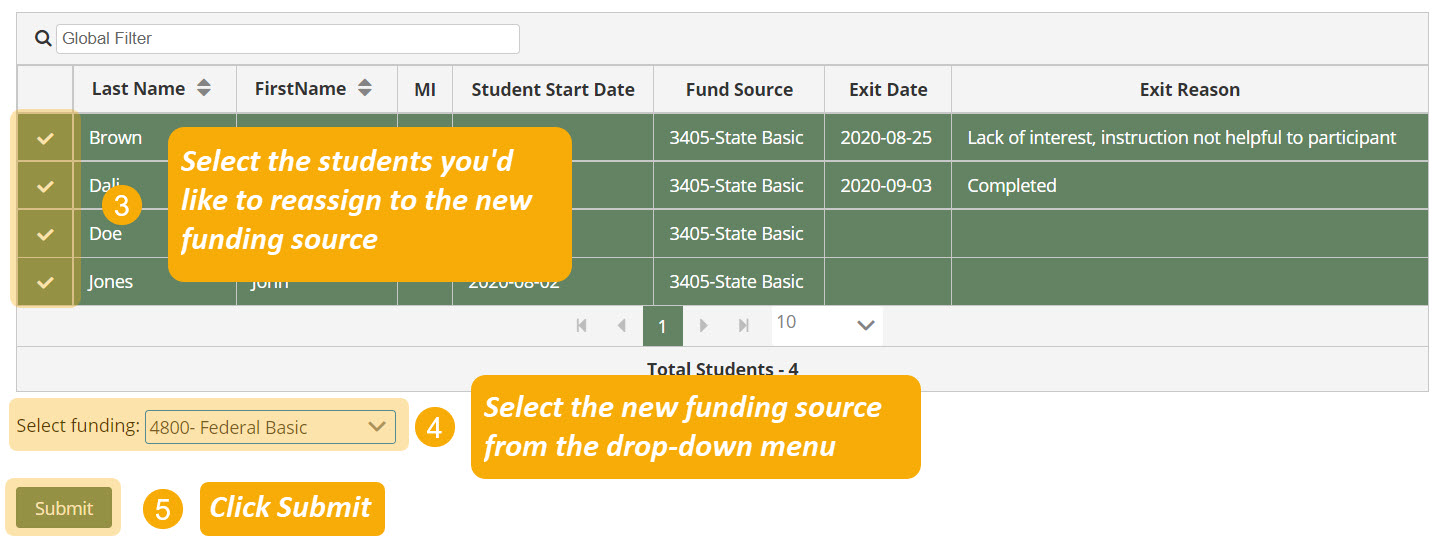
Step 2: Reassign all students in the class to the new funding source. Click Submit.
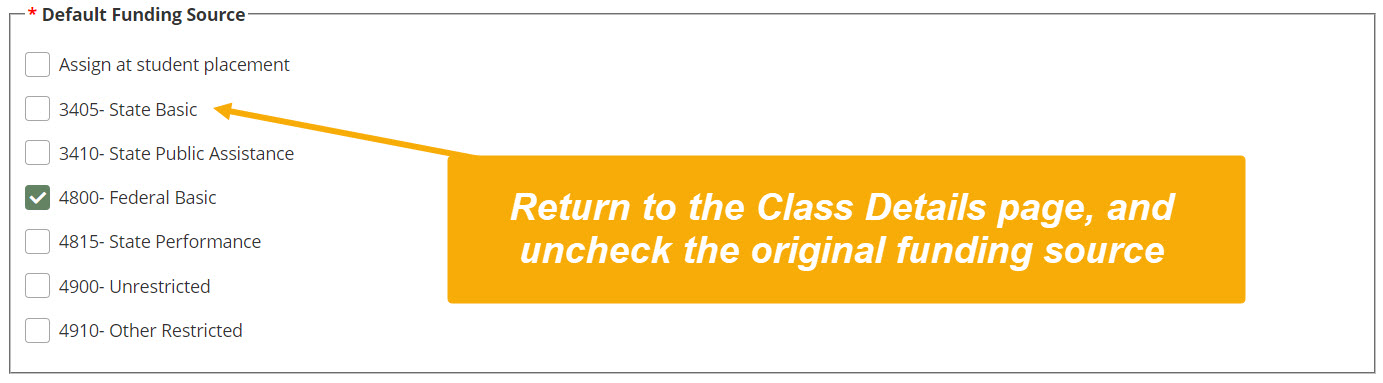
Step 3: (If applicable) If all students in the class have been assigned exclusively to the new funding source, remove the first funding source. Click Submit.
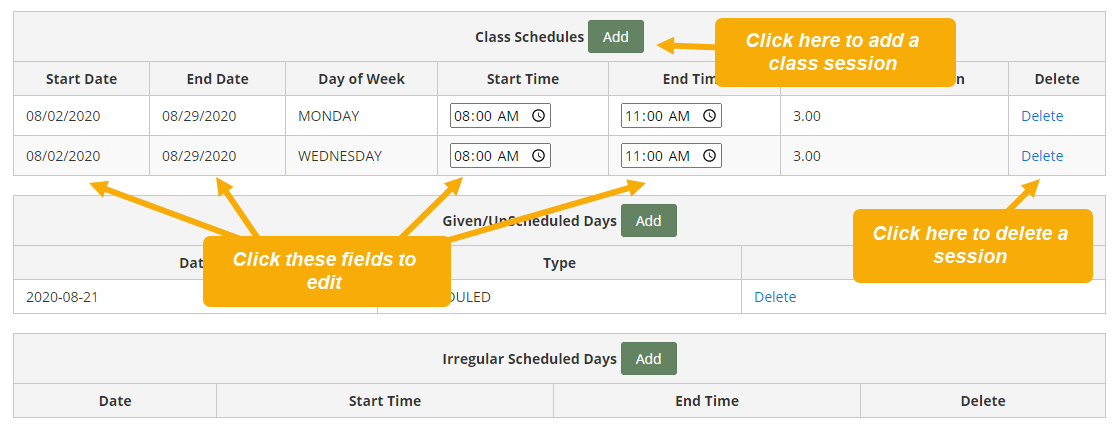
Class Schedule
Class schedule changes are allowed on a limited basis. Start and end date modifications are allowed for open entry classes only. Fixed entry classes are not allowed to modify start and end dates for classes. Class meeting day and meeting time adjustments are allowed for either enrollment type.
Note: Any changes to the class schedule will result in attendance record recalculation for all students. This may result in different calculations of instructional hours or invalidate existing attendance records.
To change the class schedule, click on the data and time fields in the Class Schedule section of the screen. To add a class session, click the Add button. To delete a class session, click the Delete link.
Note: Attendance should be checked for invalid flags if schedules are changed.
Assign Instructors
Additional instructors for the class can be assigned by clicking the Add Instructor(s) button. The process to assign an additional instructor is the same as assigning an instructor when adding a new class.
In some cases, instructors may not be instructing for the duration of the class schedule. It is possible to update the start and end dates from the Class Add/Edit Details screen by clicking the Start and End Date fields.
To remove an instructor from the class, click the Delete link next to the selected instructor.

Note: The delete function is permanent and non-recoverable so use this feature with caution.
Roster
Once students are enrolled in a class, a roster can be displayed. Additionally, students can be enrolled in the class from the roster page. There are multiple methods to access a selected Class Roster page:
- From the Class List/Search Results page by clicking the Roster icon for the selected class.
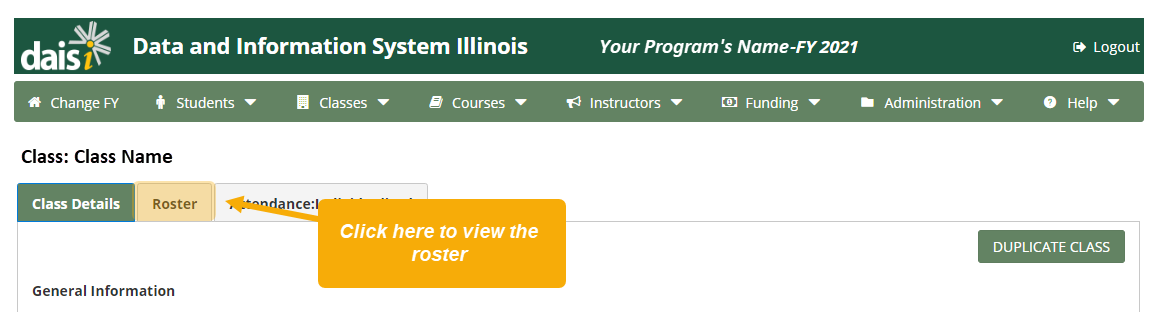
2. From the Edit Class page by clicking the Roster link in the sub-menu.
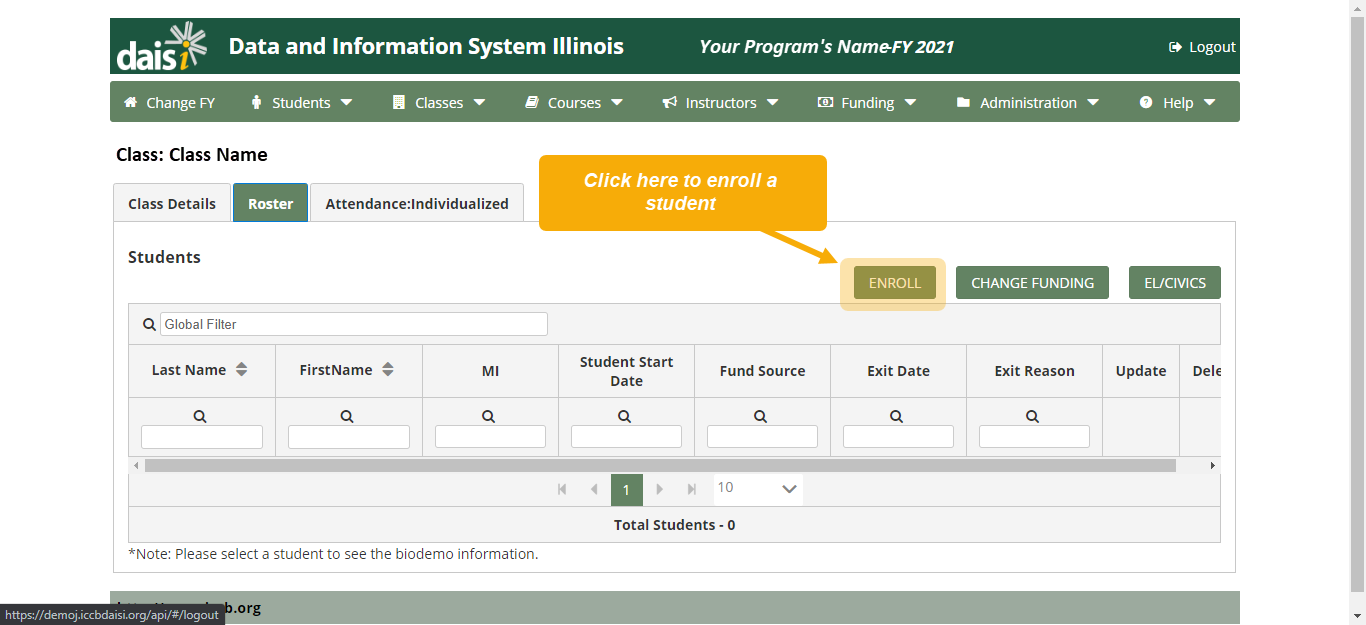
The Class Roster provides a list of all students enrolled in the class as well as the ability to enroll additional students in the selected class.
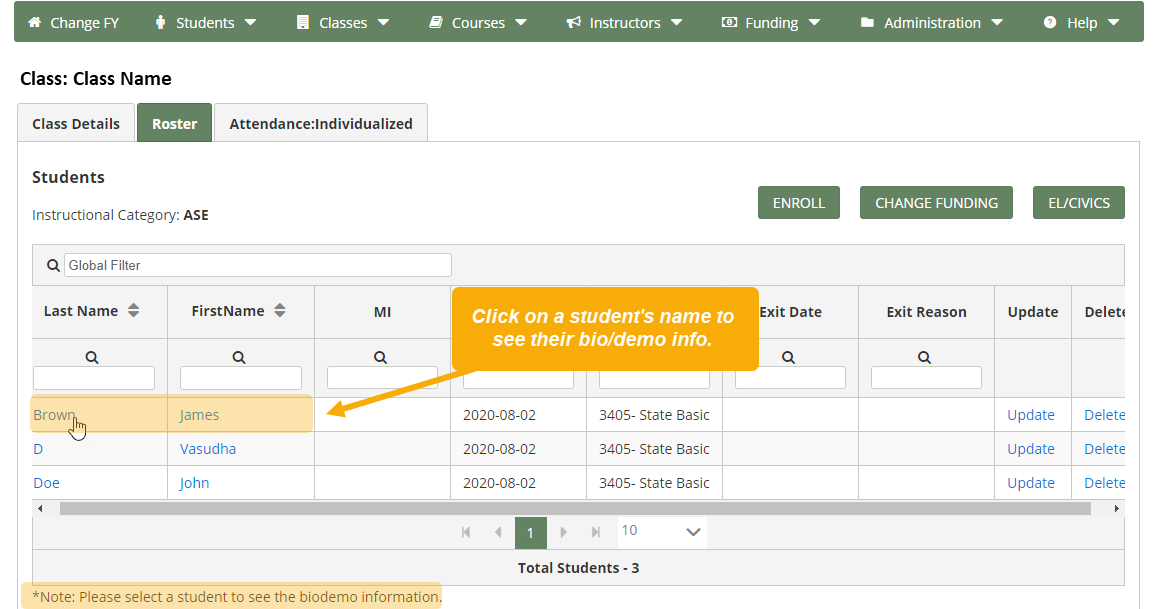
Clicking the link provided on the student name will leave the Class Roster and show the detailed bio/demo information for the student. This information is located under the Students tab and is discussed in more detail in that section of this guide.
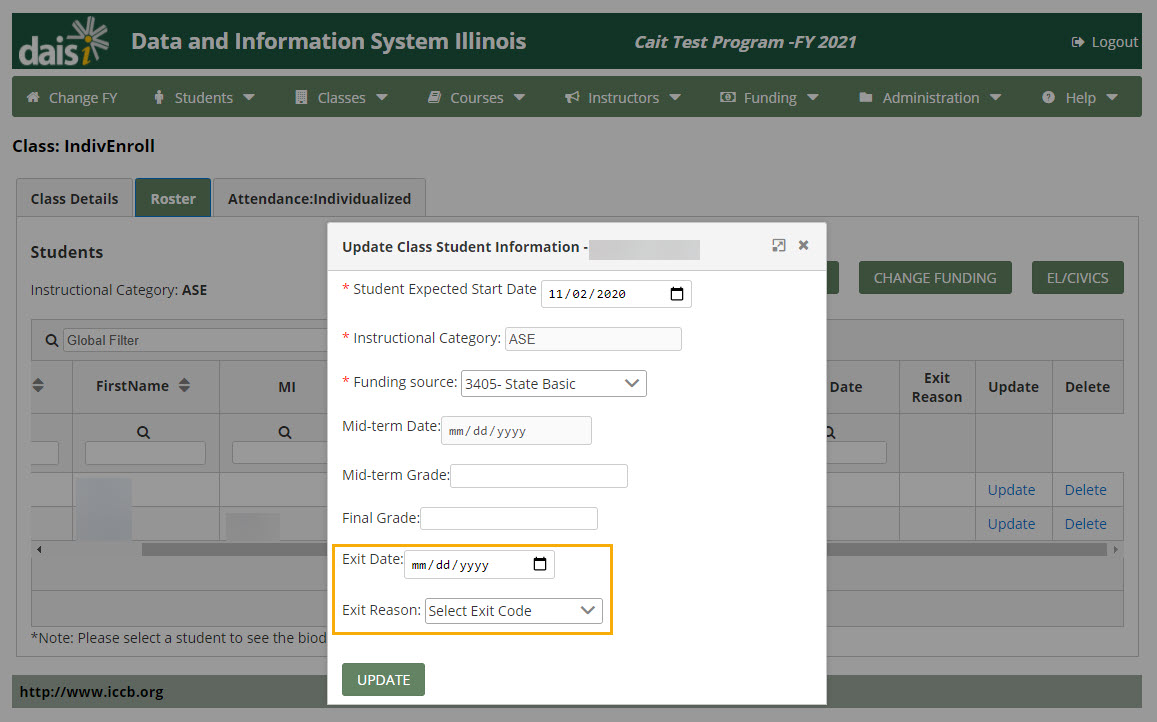
Clicking the Update link for a specific student produces a pop-up window where you can view or change the student’s:
- Start Date
- Instructional Category
- Funding Source
- Mid-term Date
- Mid-term Grade
- Final Grade
- Exit Date
- Exit Reason
Update or enter any new information and click UPDATE to save changes.
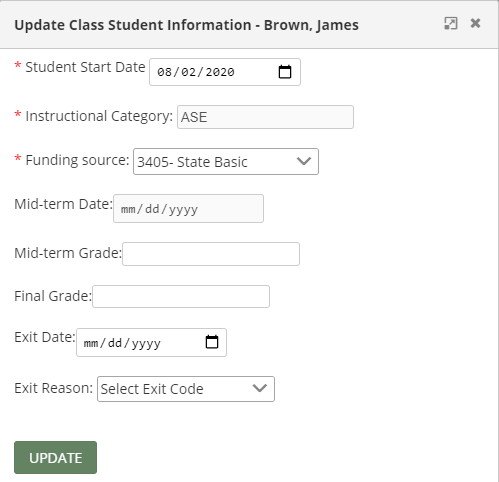
Note: Exit Date and Reason must be entered from the Attendance page for Hybrid and Open/Fixed Enrollment Classes.
Attendance
Attendance can be entered from two points in the system:
- the Attendance link on the Classes: Add/Edit Details sub-menu

2. the Student – Class Info screen

The attendance page is divided into several sections which will be outlined in detail below:
- Help/Legend
- Display/Entry Modes
- Generate Attendance
- Attendance Navigation
- Attendance Entry Grid
Help/Legend
To the right of the page is a HELP button for displaying the legend for entering attendance. Click the HELP button to display the Attendance Entry Legend.
A window will pop-up with the codes used to enter attendance, as well as two Video buttons you can click on to watch tutorials. When you are finished viewing the legend, click the X at the top right of the pop-up window to exit.
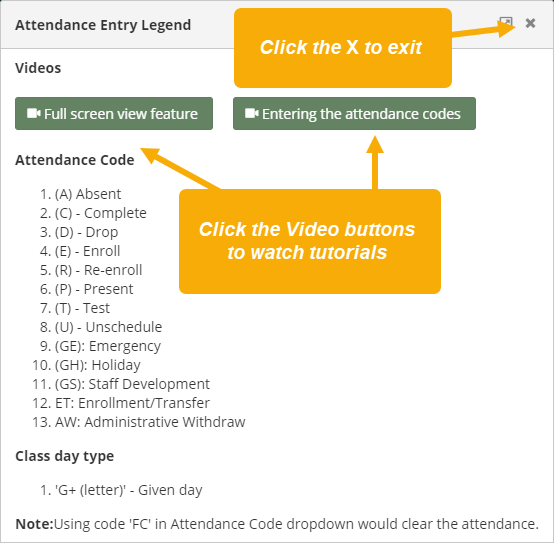
The following are the attendance code definitions:
- (A) Absent: Scheduled class meeting that student does not attend. Student does not receive attendance hours but does receive enrollment hours.
- (C) Complete: Scheduled class day on which student completed all the requirements for the class whether absent or present. Student receives both attendance and enrollment hours.
- (D) Drop: Day that student is dropped from class. Students must be dropped after five consecutive absences. Student receives neither attendance nor enrollment hours.
- (E) Enroll: First day of attendance for a student who enrolls in a class. In fixed-entry classes, students must be enrolled by the third scheduled class day. Student receives both attendance and enrollment hours.
- (R) Re-enrolled: Day student returns to class after a Drop has been registered. Student receives both attendance and enrollment hours. In open-entry and individualized instruction classes, students may drop and re-enroll at any time. In fixed-entry classes, students who drop prior to the mid-term date may not re-enroll into that same class/section. If the drop occurs after the mid-term date, students may re-enroll into that same class/section.
- (P) Present: Scheduled class that student attends. Student receives both attendance and enrollment hours.
- (T) Test: Scheduled class used for pre/post-testing. Student receives both attendance and enrollment hours. If testing is conducted outside of class time, report testing hours in the appropriate field when entering the actual test.
- (U) Unscheduled: Scheduled class day that is eliminated; class does not meet (canceled class, school vacations, breaks). Student receives neither attendance nor enrollment hours.
- (G) Given Day: Student receives enrollment hours but no attendance hours.
- E: Emergency: class is canceled due to a weather closing or other emergency
- H: Holiday: 13 holidays per year are permitted for entire program
- S: Staff Development: class is canceled to allow instructional staff to participate in professional development opportunities.
- (ET) Enrollment/Transfer: Transfers into a class are allowed during the first two weeks (14 calendar days) of the class start date for fixed entry classes only. Student must have met the enrollment requirements for the class from which they are transferring. Student cannot earn units in both classes, if student has reached midterm point of original class, ET cannot be used. When ET is used, system will prompt user for original Class/Section No and Transfer Reason. Student receives both attendance and enrollment hours.
- (AW) Administrative Withdrawal: Student is enrolled in the class but never attended. Use of the AW code exits the student from the class immediately. Student receives neither attendance nor enrollment hours.
Display/Entry Modes
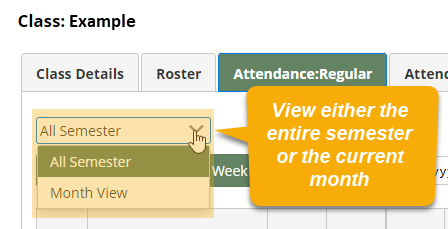
There are several display options available which allow the attendance data to be viewed and entered in different formats.
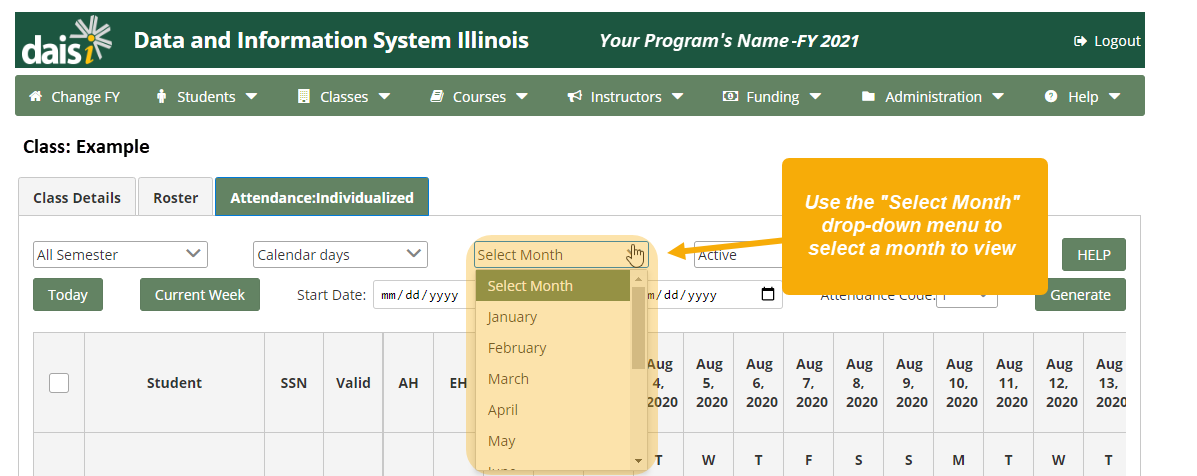
Attendance can be viewed by the month or by the semester. Select the view by clicking on the drop-down menu to the top left of the attendance table.
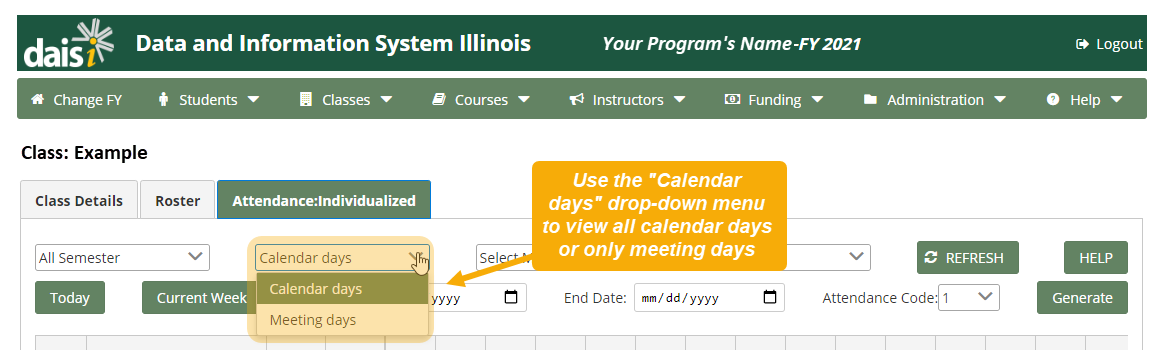
You can also choose to view all calendar days or only the days on which your class meets.
Use the Select Month drop-down menu to select a month to view.
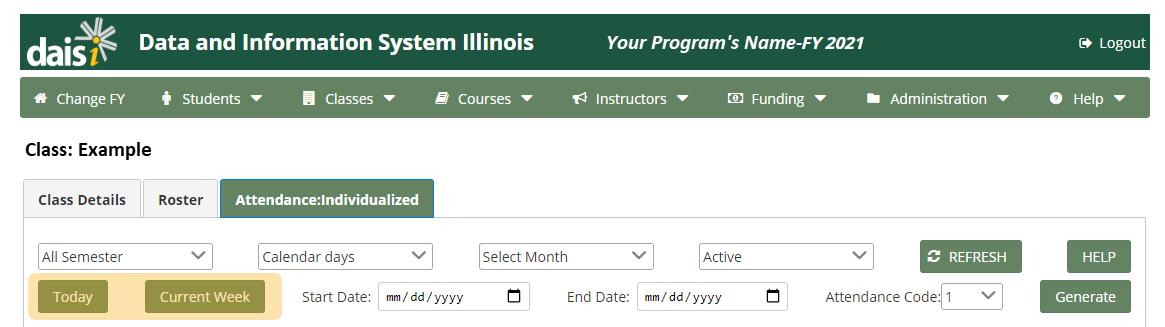
To be taken to the current day or month, use the Today and Current Week buttons.
Lastly, select the list of students to work with. To view/enter attendance for all students, select All Students. To view/enter attendance for only active students (not exited), select Active Students.
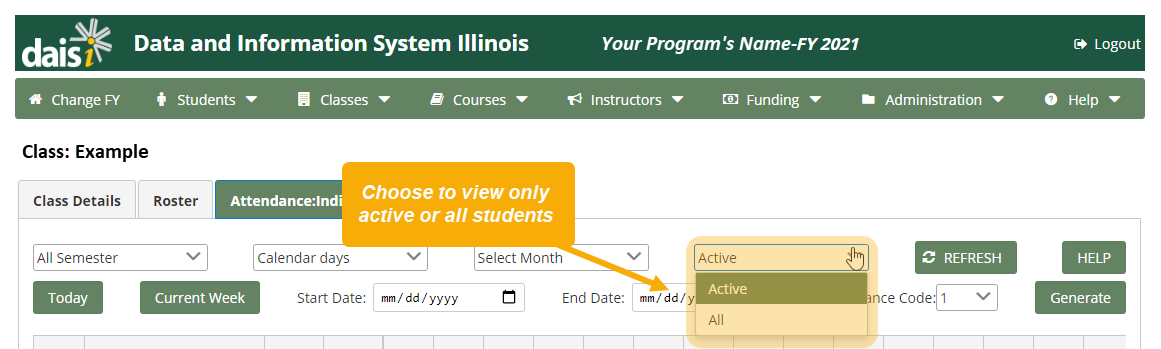
Use the REFRESH button to update the screen displayed based on the options selected.
Generating Attendance
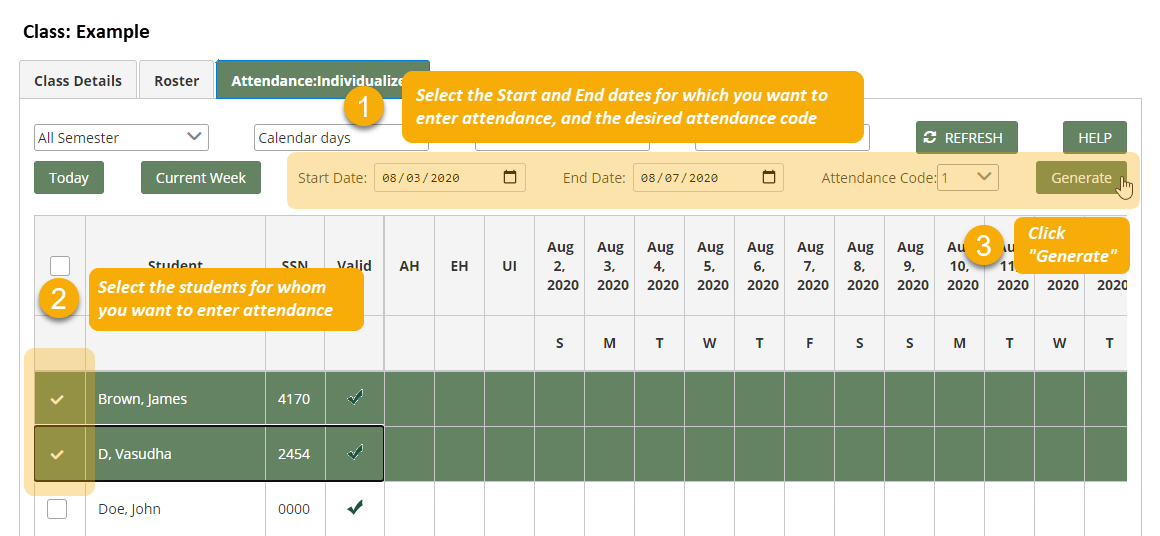
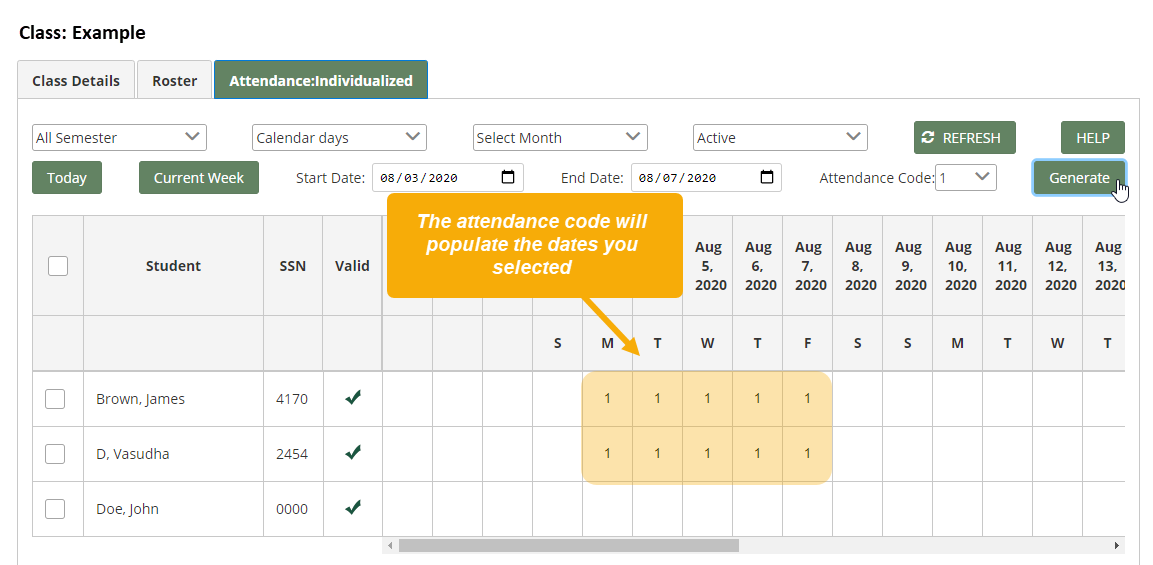
Users have the option to generate attendance for selected student(s) or the entire class at one time. Generating attendance allows the user to select a range of dates and generate Present (P) codes for all meeting days for the selected students. This method of attendance entry is an option in addition to regular attendance entry which is illustrated later in this section.
To generate attendance for a group of students over a range of days:
- Enter the Start and End Dates during and the desired attendance code.
- Select the students for whom you want to enter attendance.
- Click Generate.
The attendance code will populate the dates you selected.
When you are finished generating attendance, click Submit at the bottom right corner of the screen. If the attendance was saved successfully, a prompt will appear to confirm the data has been saved.
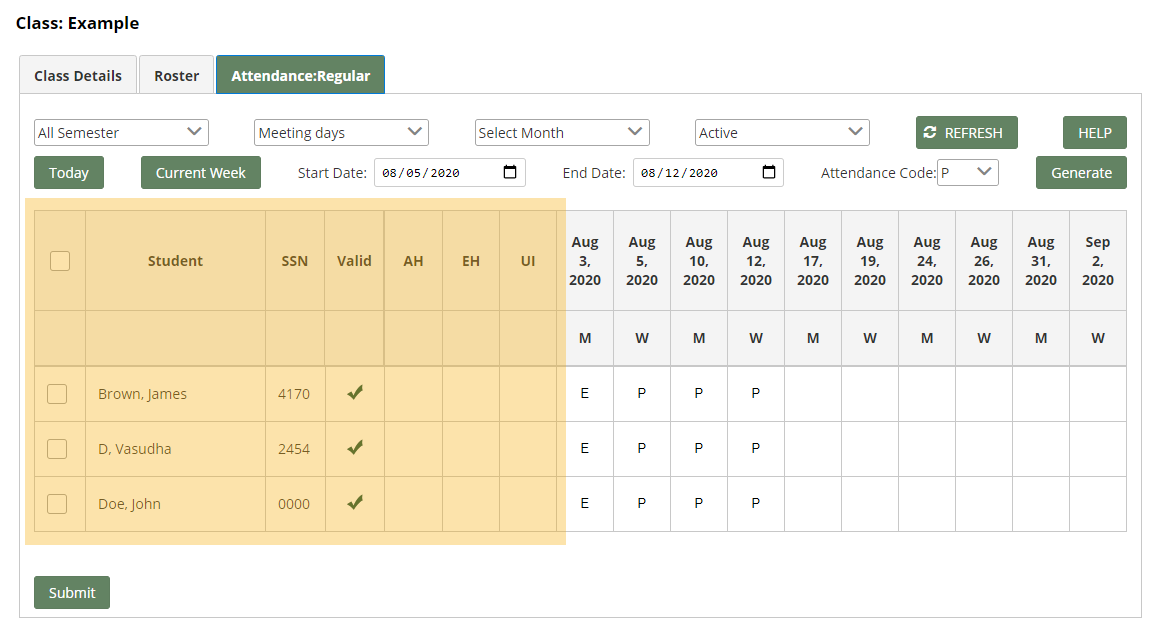
Attendance Grid Overview
The attendance grid displays columns of information for each student in the class.
The information-based columns are:
- Select box: allows students to be selected by placing a check in the box. This is used with the generate attendance feature.
- Note: Select the top box in the table header to select all students.
- Student: the name of the enrolled student. Last name and first name are displayed. Students are sorted alphabetically by last name.
- Note: If the student name turns red, this indicates the units of instruction accrued by the student exceeds the maximum units of instruction for the course to which the selected class is connected.
- SSN: the last four digits of the social security number of the student (if available).
- Valid: status of the attendance area for the student – it will display one of three icons.
- Valid indicates that the entries for the student pass the test for attendance validity.
- Valid no calculation means that attendance has been updated but the SUBMIT button has not yet been clicked to validate the entries and update the totals.
- Invalid means that the changes made to the student attendance did not pass validation rules and must be corrected. Rolling the mouse pointer over the icon will display a pop-up window detailing the reason why attendance is marked as invalid. It may be necessary to switch to Correct Mode to update attendance and correct the invalid entry.
- AH – Attendance Hours: number of calculated attendance hours in the selected class.
- EH – Enrollment Hours: number of calculated enrollment hours for the class. For fixed entry classes, if before midterm, enrollment hours = zero. For fixed entry classes, if after midterm, enrollment hours = total scheduled hours for the class.
- UI – Units of Instruction: the number of calculated enrollment hours divided by 15.
Attendance Entry
Directly to the right of the student’s attendance information columns is where the daily attendance for a student should be entered.
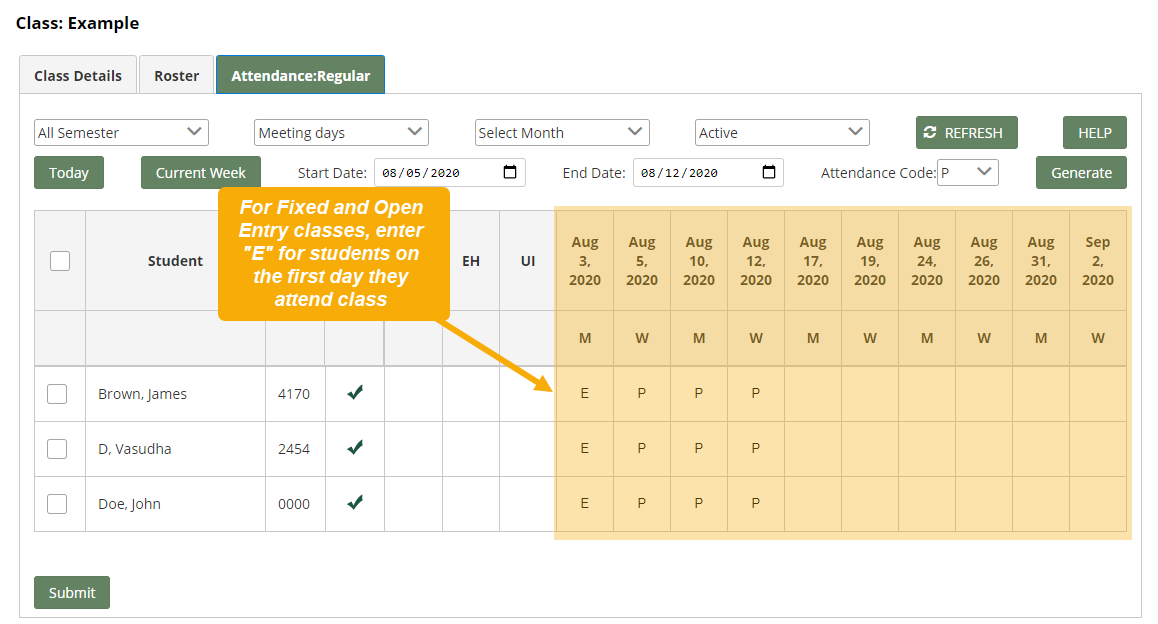
To begin entering attendance for a student, users must use the ‘E’ (enroll) code. Enter an ‘E’ in the cell representing the student’s first attendance date.
Next, continue to enter appropriate attendance codes for each student listed. When finished, click on the Submit button to validate attendance and calculate attendance hours, enrollment hours, and units of instruction for each student.
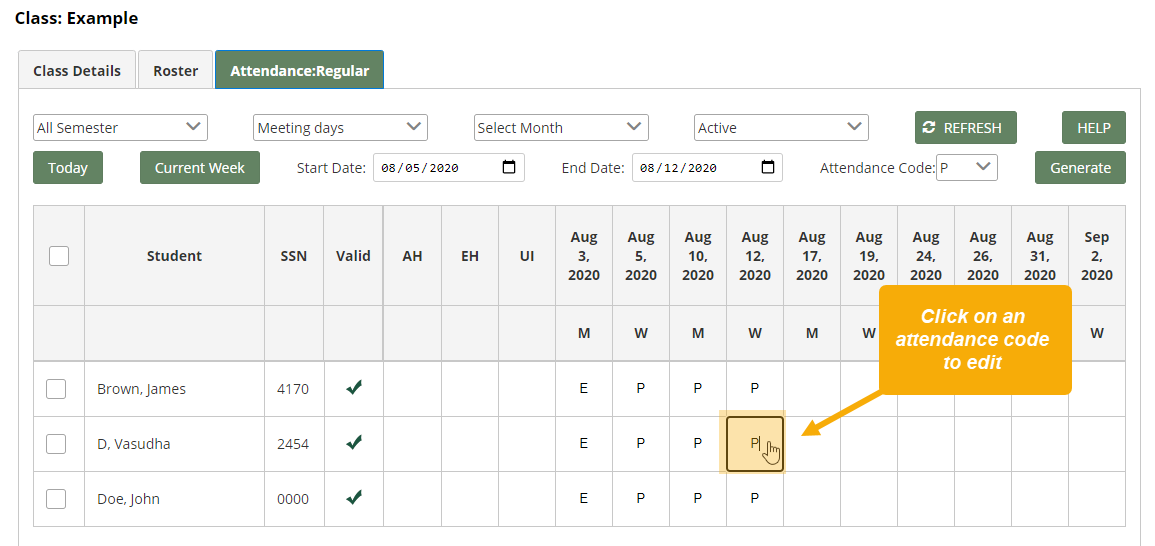
To edit a student’s attendance, click on the attendance code you want to edit.
Individualized Enrollment Attendance Entry
For individualized enrollment classes, attendance is tracked by hours attended rather than by class meeting schedule.

Enter the hours attended each day by the student and click the SUBMIT button at the bottom of the screen to calculate totals for the student.
To exit a student from a 100% Individualized Enrollment class (not Hybrid), go to the Class Roster page, scroll to the right and click the “Update” link, and enter the student’s exit information in the pop-up window:
For additional help with entering Individualized Attendance, see this Instructional Video.
Hybrid Courses
This is a special note for courses which are Hybrid. In this situation, the attendance entry must be completed for the regular class meeting schedule as well as the individualized enrollment portion.
Refer to the attendance page sub-menu for options to access both types of attendance entry grids. The regular class schedule attendance grid is available by clicking the Attendance: Regular tab and the individualized portion of the attendance grid is available by clicking the Attendance: Individualized tab.
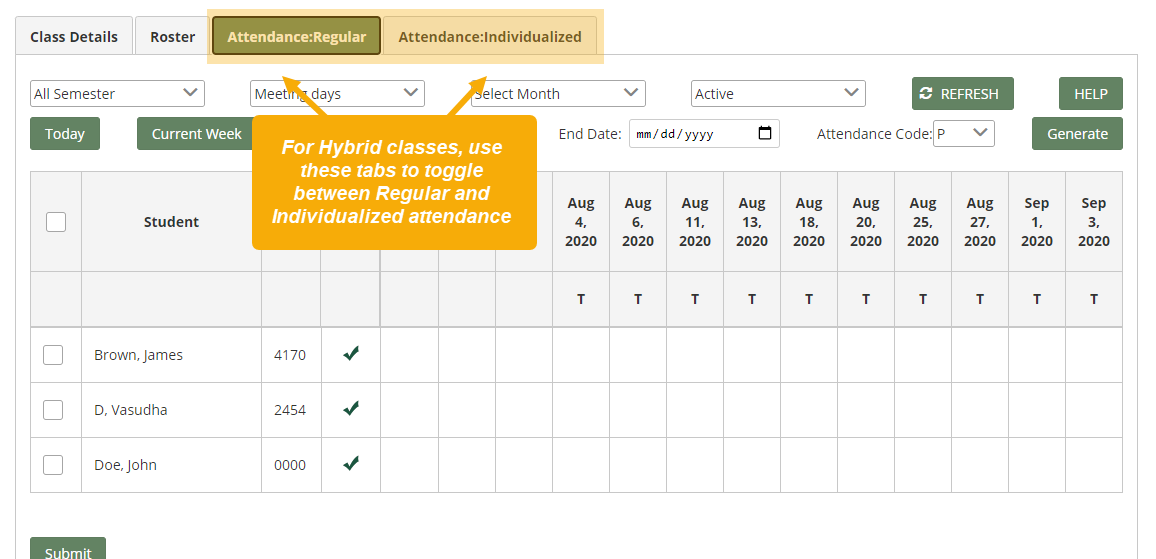
Once an attendance grid has been selected, the data entry process is the same as described in sections above.
Stack Classes
To view an instructional video about the Stack Classes feature, click this link: https://youtu.be/fBkhwdXDDss
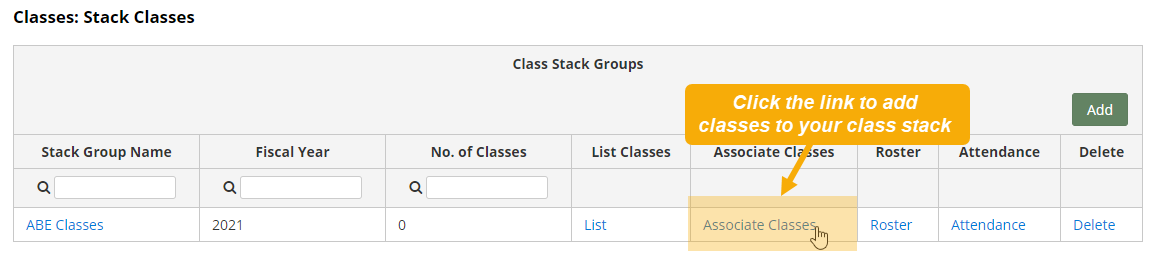
DAISI provides an optional feature to allow programs to stack specific classes. To access the Stack Classes page, select the Stack Classes menu option under the Classes tab in the navigation at the top of the page.
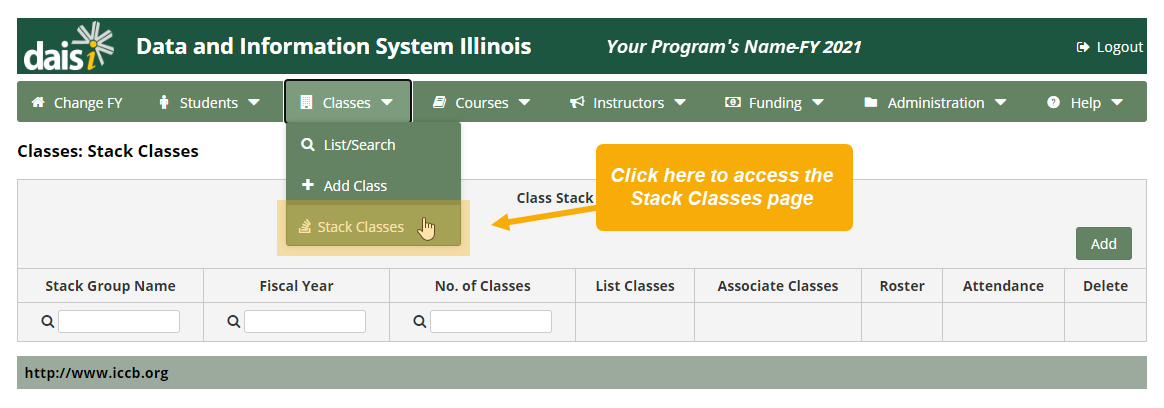
Stacked classes are organized into Stack Class Groups. Multiple classes can be associated to a single Stacked Class Group. Additionally, programs can have multiple Stacked Class Groups.
To add a new Stacked Class Group, click the Add button on the right side of the page. The page will prompt to enter a name and brief description of the Stacked Class Group. Enter this information and click SUBMIT to save the Stacked Class Group.
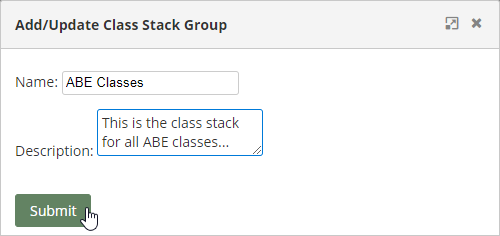
If your class stack group is saved successfully, a prompt will appear on the page to confirm that it’s been saved.
Associate Classes
The next step is to associate classes to the Stacked Class Group recently created. Click the Associate Classes link on the screen provided.
The Add Class to Stack pop-up window will appear.
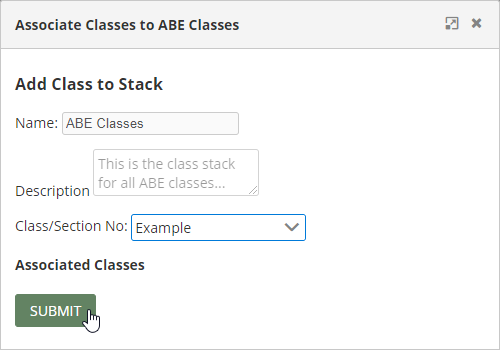
If you know the name of the Class/Section No to associate, type it into the space provided.
Otherwise, click the SEARCH button to isolate the Class/Section No to associate with the class stack group. Once the class is found, click on the name to select it from the drop-down menu.
To complete the associate class process, click SUBMIT on the Add Class to Stack page.
Repeat the above process to continue associating classes to the class stack group.
Note: In order for classes to be stacked, they must share the same building and room number. In addition, the stacked class should also have the same start time.
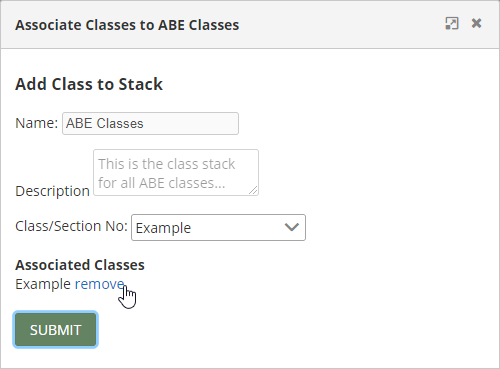
To remove a class from a Class Stack Group, click on the Associate Classes link. A list of classes associated with the selected Class Stack Group will appear with remove links next to each class. Click the remove link and then click SUBMIT to save the changes.
List Classes
Once classes have been associated with the Stacked Class Group, the List link will appear.
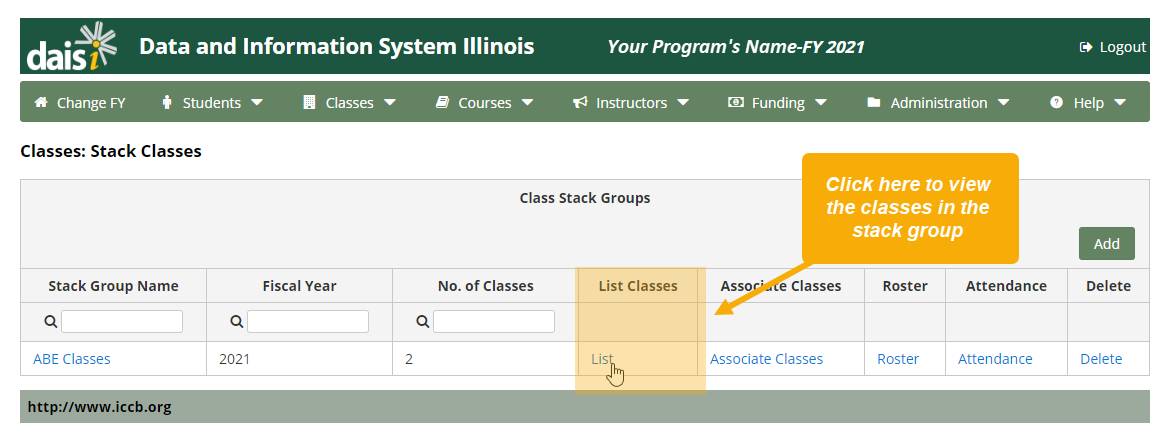
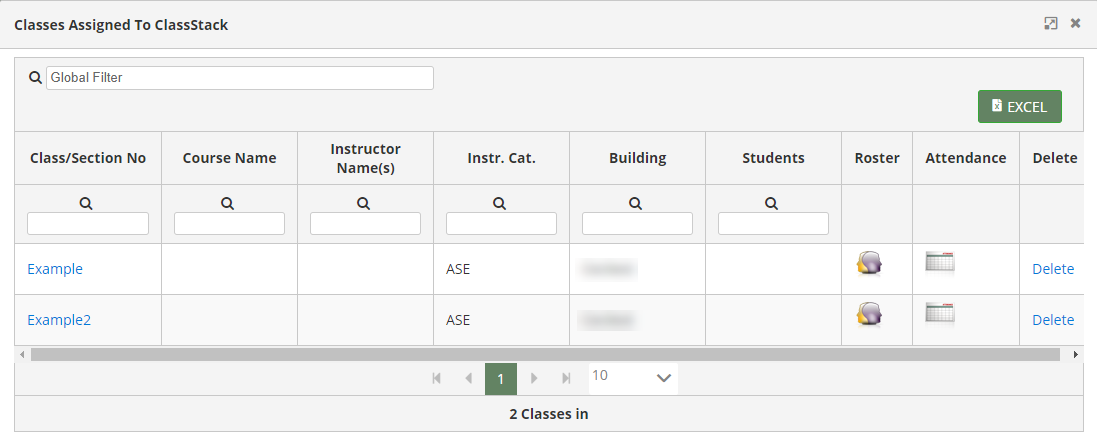
Click on the List link to view a list of classes associated to the selected stacked class group. When viewing a list of classes associated to the stacked class group, it allows direct manipulation of the individual class (i.e. Roster, Attendance, etc). To close the Class Stack Group list pop-up window, click the X in the upper right-hand corner of the screen.
Roster
Click the Roster icon on the Class Stack Groups page to view a combined list of students enrolled in all classes associated with the selected Class Stack Group.
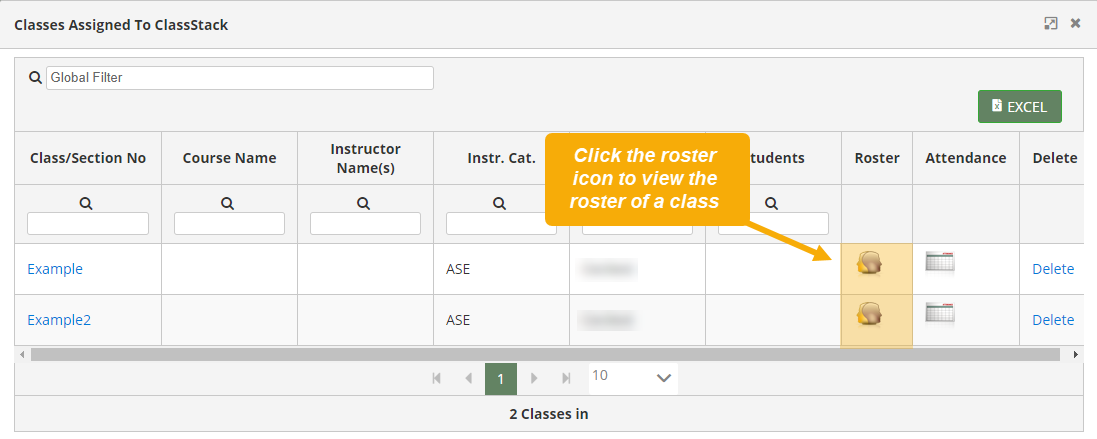
This roster can be manipulated in the same way that an individual class roster is manipulated. For an explanation of features, refer to Classes – Roster section of the help.
Attendance
To view a list of all students in a class associated with a stack class group, select the stack class group from the Classes: Stack Classes page, then select the Attendance tab.
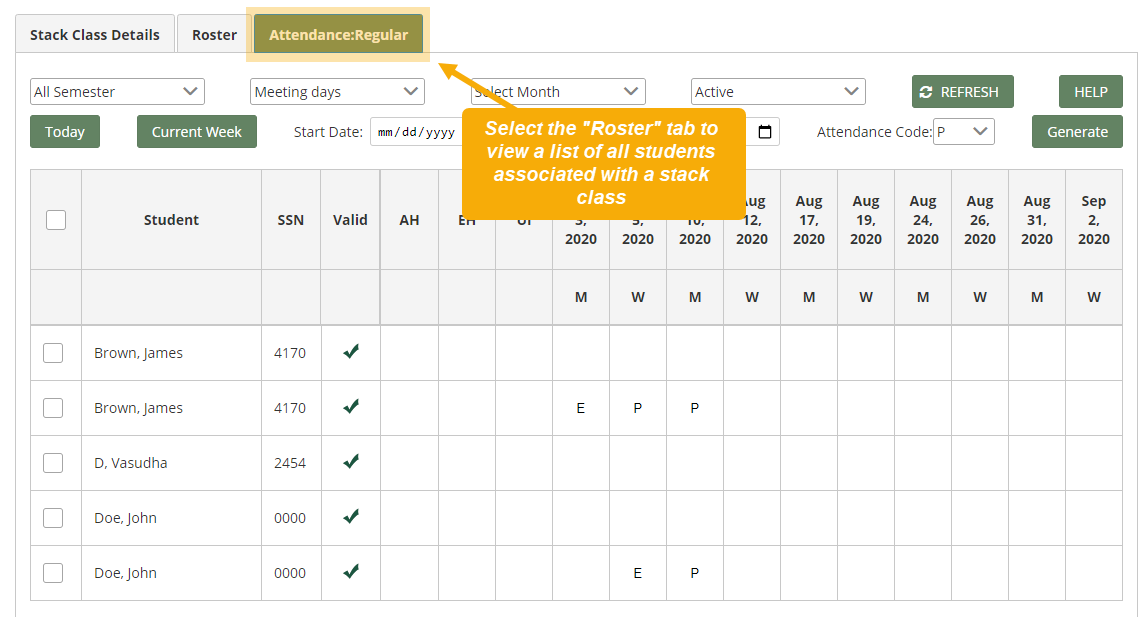
The attendance grid can be manipulated in the same way that an individual class attendance grid is manipulated. For an explanation of features, refer to Classes – Attendance section of this guide.
Note: It is possible to navigate directly to the individual classes from the stacked class attendance grid. Located above the attendance grid and display selection options, a list of links is available after the sub-header: Stack Classes. The class names are links directly to the individual class information. Click to view individual class information.
Delete
It is possible to delete a stacked class group by clicking the Delete link for the selected class stack group.
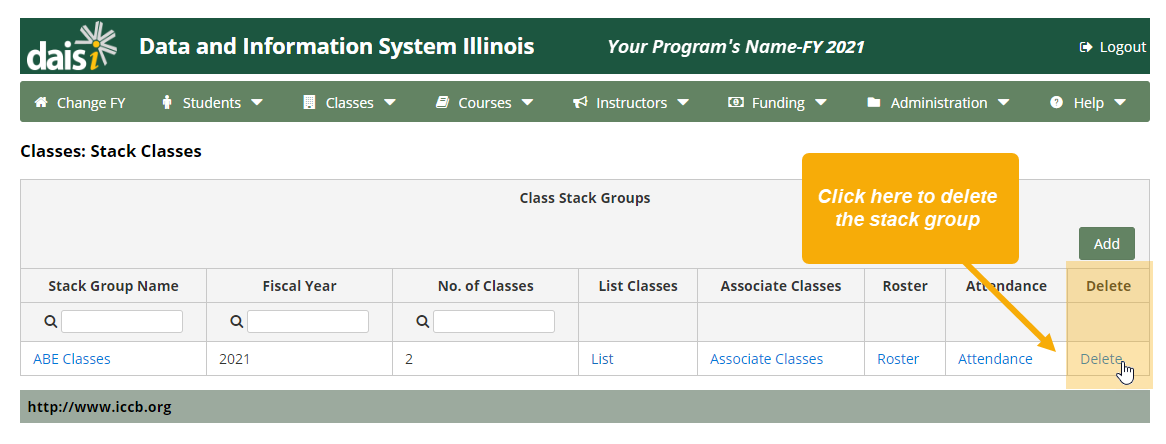
The delete function will not delete any individual class data, but rather remove the association which classes have with one another. All individual class data will remain in-tact.
Was this page helpful? Let us know.